FaxPress Premier WebHelp: Admin Guide > Connectors > HP 9100C Digital Sender
|
HP9100C Scanner Connector
 Other Related Topics...
Integrating the HP 9100C Digital Sender (Network Scanner) with the Castelle FaxPress consists of two steps:
|
1.
|
Enabling HP Scanner Support on the Castelle FaxPress. |
|
2.
|
Installing and configuring the HP 9100C Digital Sender and Digital Sender Service so that they will submit faxed jobs to the Castelle FaxPress. |
Enable HP Scanner support on the Castelle FaxPress
|
1.
|
Launch the FaxPress client and log in to the FaxPress as Administrator or as a FaxPress user with Administrator rights. |
|
2.
|
Right-click on the FaxPress server listed under FaxPress Neighborhood and then select the Properties button. |
|
3.
|
In the FaxPress Server Properties dialog box, select the Advanced Functions tab. |
|
4.
|
In the Enable support for section, check the box next to HP Network Scanner. You will be prompted to reboot the FaxPress for the change to take effect. |
|
5.
|
After the FaxPress reboots, there should be a FaxPress user called HP_Scanner and a new directory called HPFSCAN under the \castelle\08xxxxxx\ directory on the FaxPress file server.
This is the directory that you will point the HP Digital Sender service to during the HP Digital Sender Service installation. |
|
6.
|
The FaxPress is now ready to support a HP 9100C Digital Sender. |
Install and Configure the HP Digital Sender Service and HP 9100C Digital Sender
Installing
Before installing the HP Digital Sender Service, make sure the HP Digital Sender Service user name has:
|
■
|
a password that never expires. |
|
■
|
Log on as Service rights. By default the administrator user will not have Log on as Service Rights. This will have to be granted to the user.
|
Install only on a Windows NT or 2000 computer. If an HP Network Scanjet 5 scanner is on the network, the HP Digital Sender Service can be installed on the Windows NT server the HP Network Scanjet 5 scanner service is on. This will manage both the HP Network Scanjet 5 scanner and the HP Digital Sender.
Follow these steps to run the setup:
|
1.
|
Run the master setup on the HP 9100C Digital Sender CD. |
|
2.
|
Click Install the HP Digital Sender 9100C. |
|
3.
|
On the type of installation screen, click HP 9100C Administrator. |
|
4.
|
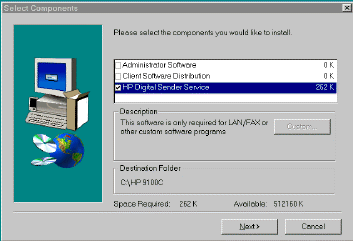
In the component screen uncheck Administrator software, and check HP Digital Sender Service. Click Next. |
|
5.
|
Enter HP Digital Sender User name information: user name and password (created in the steps above). |
|
6.
|
A question will appear prompting for the addition of the Fax Service Functionality. Click Yes to add. |
|
7.
|
Choose FaxPress from the list of LAN Fax vendors, and browse to the Work Area Path (typically \castelle\08xxxxxx\hpfscan on the file server hosting the FaxPress). |

|
8.
|
A reminder message will pop up prompting to make sure the HP Digital Sender Service user has read/write access to the work area. |
Configuring
|
2.
|
Under Options, uncheck Interview Mode. This will put HP Jetadmin in Expert mode. |
|
3.
|
Right-click the HP Digital Sender and click Modify. |
|
4.
|
Click the Fax tab and Network Fax Server. (This is a functionality of Firmware 3.0. Click here for the upgrade.) |
|
5.
|
In the HP Digital Sender Service box, enter the Network Name or IP address of the computer that has the HP Digital Sender LAN Fax Service installed on it. |
|
6.
|
In the LAN Fax Server box, choose the Product Name in the dropdown list. |

|
7.
|
Check notifications as needed (for fax transmission status) and Billing Account if necessary. |
|
9.
|
Check the Enable Fax checkbox. |
|
10.
|
Add Fax destinations to the public fax address book: |
|
a.
|
In Address Book Manager, click Public Fax. |
|
c.
|
Fill in the information in the Fax dialog box and click Add. |
|
d.
|
Repeat step c for each fax destination. |
|
e.
|
Click Close when finished. |
|
11.
|
Send a test document. |
FaxPress Premier WebHelp
Last Updated: 11/1/2007
E-mail this page
|
Castelle
855 Jarvis Drive, Suite 100
Morgan Hill, CA 95037
Toll-free 800.289.7555
Tel 408.852.8000
Fax 408.852.8100
www.castelle.com
|